Getting started
Documentation

March 18, 2019
This guide provides practical and immediately actionable steps for getting started with Aito.
For quick upload instructions using the Aito CLI tool scroll to the bottom.
1. Introduction
Welcome to the kickstart guide with Aito.ai with all the necessary steps to get started! We start with looking at how Aito works when everything has already been set up, and then we see how to set everything up ourselves. To follow this guide, you may use your favorite REST client or paste the queries directly to your command line. Let’s go!
2. What Aito does
We'll first show you Aito in action. We have set up a public grocery-store demo instance for everyone to play with. Each row in the impressions table is a moment where a shopper saw a product, with a purchase flag for whether they bought it, and links to the product and to the context.user who saw it.
Let's ask Aito to recommend what a shopper is most likely to buy. Copy the following query to your command line and hit enter:
curl --request POST \
  --url https://shared.aito.ai/db/aito-demo/api/v1/_recommend \
  --header 'content-type: application/json' \
  --header 'x-api-key: yg4rTlXkqDzm4y8gPeY75HCKaNwfbTQ2si64ONTi' \
  --data '{
    "from": "impressions",
    "where": { "context.user": "veronica" },
    "recommend": "product",
    "goal": { "purchase": true },
    "limit": 2,
    "select": ["$p", "name", "tags"]
  }'
Aito returns the products Veronica is most likely to buy, each with its probability ($p):
{
  "offset": 0,
  "total": 42,
  "hits": [
    { "$p": 0.193, "name": "Pirkka iceberg salad Finland 100g 1st class", "tags": ["fresh", "vegetable", "pirkka", "salad"] },
    { "$p": 0.167, "name": "Cucumber Finland", "tags": ["fresh", "vegetable"] }
  ]
}
Veronica is a health-conscious shopper, so Aito recommends fresh vegetables. The recommendation is personalized: it is computed only from the patterns Aito has seen for her.
Change the user and the basket changes. Run the same query with "larry" in place of "veronica", and Aito recommends a banana and some toilet paper instead. Same query, different shopper, different answer, because each is computed from that shopper's own history rather than a one-size-fits-all model.
Now let's ask Aito to show its work. Understanding the reasoning behind a prediction is critical in any machine-learning application. Add $why to the select and Aito returns the factors behind the recommendation:
curl --request POST \
  --url https://shared.aito.ai/db/aito-demo/api/v1/_recommend \
  --header 'content-type: application/json' \
  --header 'x-api-key: yg4rTlXkqDzm4y8gPeY75HCKaNwfbTQ2si64ONTi' \
  --data '{
    "from": "impressions",
    "where": { "context.user": "veronica" },
    "recommend": "product",
    "goal": { "purchase": true },
    "limit": 1,
    "select": ["$p", "name", "$why"]
  }'
The response carries a $why factor tree. The parts that matter are the lifts, the multipliers that moved the probability (trimmed here for readability):
{
  "$p": 0.193,
  "name": "Pirkka iceberg salad Finland 100g 1st class",
  "$why": {
    "type": "product",
    "factors": [
      { "type": "baseP", "value": 0.052, "proposition": { "purchase": { "$has": true } } },
      { "type": "hitPropositionLift", "proposition": { "tags": { "$has": "fresh" } }, "value": 1.50 },
      { "type": "hitPropositionLift", "proposition": { "name": { "$has": "finland" } }, "value": 1.88 }
    ]
  }
}
Read in plain language: against a base purchase rate of about 5%, this product being tagged fresh lifts Veronica's likelihood by 1.5x, and it being a Finnish product lifts it by 1.88x. Aito recommends fresh Finnish produce because that is what her history supports, and it tells you exactly why.
3. Setting up your own Aito
Now we take a few steps back and start from uploading your own data into a schema. Or in case you don’t right now have suitable data available, you may download and use a sample dataset from our kickstart repository: https://github.com/AitoDotAI/kickstart. "reddit_sample.csv" contains a sample of the full comments dataset and "users.csv" is a completely fabricated table to represent the Reddit users. To keep following the guide, you’ll need API keys which allow you to access your Aito instance. If you don’t have an API key yet, please contact us here.
Setting up your own schema has three distinct steps. First we look at the schema structure, then create an empty schema and tables, and finally upload the data into their correct tables. We highly recommend using a REST client for HTTP-API interaction.
Schema planning
Very often your data is stored in a collection of connected tables. In our Reddit example, the data is divided into two tables: Comments and Users. Aito will be able to find information across linked tables, and in our case the tables are linked together with “author” column. We could also link in a third table describing for example the subreddits, daily weather or something else. At this point, you need to go through your files and determine which tables and columns are linked.
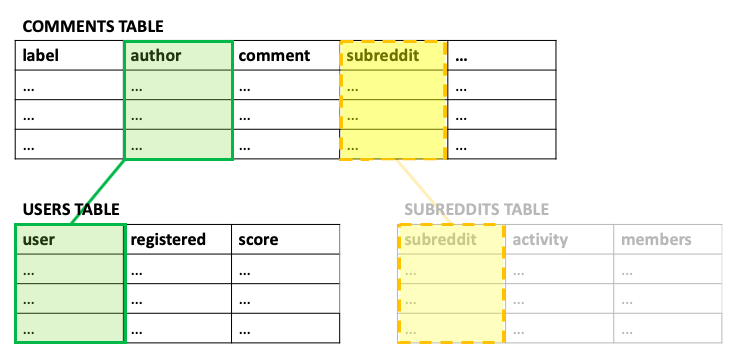
Now that we know the structure, we can start creating the database schema.
Creating your Aito schema
Now we define the tables, columns and their individual types and other specifications in the JSON format. This important step is a bit tedious but also necessary to ensure correct formatting of the data. In the next chapter we introduce our Command Line Interface (currently alpha version) for the automation of some parts of this process.
The structure of the JSON:
{
  "schema": {
    "table1": {
      "columns": {
        "column1": {"type": "Data type"},
        "column2": {"type": "Data type", "analyzer": "english"},
        ...
      },
      "type": "table"
    },
    "table2": {
      "columns": {
        "column1": {"type": "Data type", "link": "table1.column2"},
        "column2": {"type": "Data type"},
        ...
      },
      "type": "table"
    },
    ...
  }
}
Double check the JSON with care and add any necessary specifications such as links (connects two tables on one column) and text analyzers (treats the value as separate words instead of a single class). Make sure the linked columns have the same type. With our sample data, here’s how the full schema creation request looks like (replace the environment name and api key with yours):
curl --request PUT \
  --url https://$AITO_INSTANCE_URL/api/v1/schema \
  --header 'content-type: application/json' \
  --header 'x-api-key: your-rw-api-key' \
  --data '{
  "schema": {
    "users": {
      "type": "table",
      "columns": {
        "registered": {
          "type": "String",
          "nullable": false
        },
        "score": {
          "type": "Int",
          "nullable": false
        },
        "user": {
          "type": "String",
          "nullable": false
        }
      }
    },
    "comments": {
      "type": "table",
      "columns": {
        "subreddit": {
          "type": "String",
          "nullable": false
        },
        "author": {
          "type": "String",
          "nullable": false,
          "link": "users.user"
        },
        "score": {
          "type": "Int",
          "nullable": false
        },
        "label": {
          "type": "Int",
          "nullable": false
        },
        "downs": {
          "type": "Int",
          "nullable": false
        },
        "date": {
          "type": "String",
          "nullable": false
        },
        "comment": {
          "type": "Text",
          "nullable": false,
          "analyzer": "english"
        },
        "ups": {
          "type": "Int",
          "nullable": false
        },
        "parent_comment": {
          "type": "Text",
          "nullable": false,
          "analyzer": "english"
        },
        "created_utc": {
          "type": "String",
          "nullable": false
        }
      }
    }
  }
}'
If there were no errors, the request sets up and returns the full schema structure. You can view your schema again with:
curl --request GET \
  --url https://$AITO_INSTANCE_URL/api/v1/schema \
  --header 'content-type: application/json' \
  --header 'x-api-key: your-rw-api-key'
Uploading data into Aito
Aito expects data in a records-oriented JSON where each row is an individual item, such as:
[
	{"user":"Trumpbart","registered":"2018-5-30","score":-111},
	{"user":"Shbshb906","registered":"2018-7-10","score":124},
	{"user":"Creepeth","registered":"2013-4-6","score":10},
	…
]
To convert a CSV into the JSON format, you may use any script or converter you like, or try the Command Line Interface discussed in the next chapter. With your data in JSON, you may now upload it to each table. This batch upload request can support up to 50 000 rows at a time. If your file contains more rows, you may use a script to loop through the data. The following curl request uploads up to 50 000 rows to the “users” table:
curl --request POST \
  --url https://$AITO_INSTANCE_URL/api/v1/data/users/batch \
  --header 'content-type: application/json' \
  --header 'x-api-key: your-rw-api-key' \
  --data '
  [
	{"user":"Trumpbart","registered":"2018-5-30","score":-111},
	{"user":"Shbshb906","registered":"2018-7-10","score":124},
	{"user":"Creepeth","registered":"2013-4-6","score":10}
	...
  ]'
Repeat the process for each table you wish to upload data into. To view the content of the “users” table, you may use:
curl --request POST \
  --url https://$AITO_INSTANCE_URL/api/v1/_query \
  --header 'content-type: application/json' \
  --header 'x-api-key: your-rw-api-key' \
  --data '{
	"from": "users",
	"limit": 10
}'
Your data is now ready for predictions!
Using Command Line Interface
The Aito Command Line Interface (CLI) is a tool to introduce automation into this process. It helps you by generating the table schema JSONs required for schema creation, converts CSV data to JSON, and uploads data into your Aito instance. Please do note it’s still an early alpha version. Currently you can't create a full schema with the tool by one command, you'll need to run the commands per data table.
Here’s how to get started:
-
Install Aito CLI (requires Python 3.6+) on command line:
pip install aitoai -
On your command line, cd to the folder which contains your data files.
-
Run the following command for each of your CSV data files:
aito convert csv -c schemafile.json --json < datafile.csv > datafile.json
The last command generates two JSON files from your CSV file. “schemafile.json” contains the table schema in JSON format which you can copy to your schema creation request. “datafile.json” contains all the data in the CSV converted into the JSON format for uploading data into Aito. Make sure to change the JSON file names for each CSV file you convert.
At this point, you need to combine the schemafiles into one JSON schema, such as in "Creating your Aito schema" chapter, and send it as a PUT request to create the schema. While combining them, make sure you check if each column has the right type and add the needed column links.
After creating the schema use the following command to upload each of your data files:
aito client -u https://$AITO_INSTANCE_URL -r your-ro-api-key -w your-rw-api-key upload-batch your-table-name < your-datafile.json
This might take a while but you’ll be able to follow the progress on the command line.
Upload data with Aito CLI using the Reddit data
Example data files can be downloaded from our kickstart repository.
-
Create the needed JSON files from the CSVs:
aito convert csv -c comments_schemafile.json --json < reddit_sample.csv > comments_datafile.json
aito convert csv -c users_schemafile.json --json < users.csv > users_datafile.json -
Create users and comments table schemas into Aito:
aito client -u https://$AITO_INSTANCE_URL -r your-ro-api-key -w your-rw-api-key create-table comments < comments_schemafile.json
aito client -u https://$AITO_INSTANCE_URL -r your-ro-api-key -w your-rw-api-key create-table users < users_schemafile.json -
Upload comment and user data into Aito:
aito client -u https://$AITO_INSTANCE_URL -r your-ro-api-key -w your-rw-api-key upload-batch comments < comments_datafile.json
aito client -u https://$AITO_INSTANCE_URL -r your-ro-api-key -w your-rw-api-key upload-batch users < users_datafile.json
Inference
Finally your data is ready for the fun part. Try prediction and recommendation queries against your own data, the same way you did against the public demo above. There are many more types of inference than basic prediction which you may use to build your solutions. You'll find instructions to using all the api endpoints in our documentation: https://aito.ai/docs/api/#query-api
We highly encourage you to try them out and see which api endpoints fit your needs. An example gallery with all the different endpoints is coming up, stay tuned!
Back to developer docsAddress
Episto Oy
Putouskuja 6 a 2
01600 Vantaa
Finland
VAT ID FI34337429


