Simplifying backend development with NestJS monorepo
Olli Kanerva
Machine learning engineer
November 11, 2020 • 6 min read
The Aito console is the place where you create and manage your Aito database instances. It lets you create and manage your teams and instances, access your API keys, and manage your payment options. It also is the first step in your Aito journey. As we at Aito want you to have the smoothest experience when using and deploying machine learning applications, it is crucial that Aito console works reliably.
We continuously develop the console and sometimes old mistakes and decisions surface which causes frustration in our development process. Our initial multi repo structure was definitely one of these. Here’s how we simplified our console development process with NestJS’s monorepo mode.
The console architecture
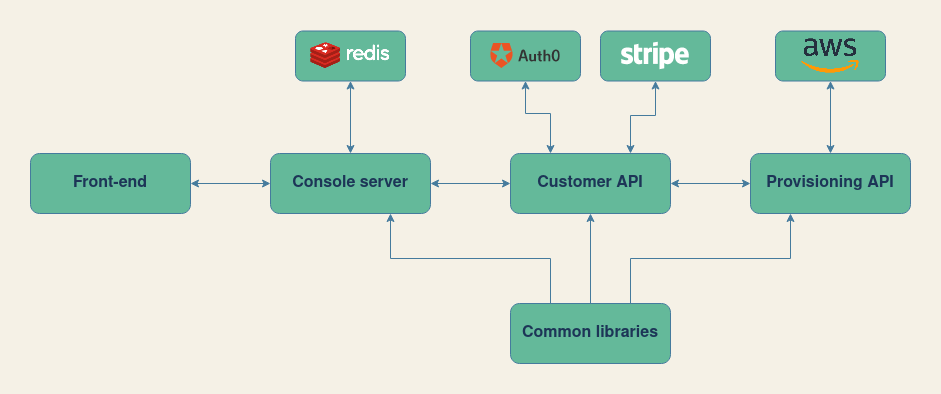
The Aito console serves as a bridge between the users and Aito instances. It consists of many different services, integrations, scripts and libraries. There are several steps before the user's requests reach all the way to the AWS and Aito instance.
The console contains four main services: the front-end React app, the console server, the customer API, and the provisioning API. Each service has a somewhat clear objective that they fulfil:
- The React front-end app serves the user interface for users to actually use the console and interact with their Aito instances
- The console-server serves the front-end to the users and handles user authentication and sessions. It proxies authenticated requests to the customer API.
- The customer API is the heart of the Aito console. It handles user data, teams, authorization, and subscriptions. Actions that require the creation or modification of Aito instances are handled by the Provisioning API.
- The provisioning API handles the communication between the application logic and AWS where customer Aito instances run.
At first, these services had essentially independent code bases and rather than shared code among them, some functionality had duplicate implementations. Because the services were still dependent on one another on the service level, we combined them into one repository which gave us the ability to do coordinated changes to all services with one pull request. Common functionalities started to grow when we made a switch from JavaScript to TypeScript and refactored every back-end service to use NestJS. Suddenly we shared types, configurations, local libraries, and packages between the services which introduced many pain points to the development flow.
Package management was maybe the biggest one. As each service was managed by their separate package.json file, it was very frustrating to maintain the same versions for every service and if one forgot to do this, very weird bugs occurred that slowed down our work.
With the local libraries that served common functionalities to every service, the problems were similar. Every time one updated a library, every service needed a new rebuild cycle to ensure that each service was using the same version of the library. This again led to weird bugs that were hard to comprehend. Sometimes the bugs surfaced not until the CI which resulted in loss of time and frustration.
We started to look for solutions to our problems to save our nerves as our problems were completely unnecessary. Lerna was one of the first ones that came up. It can handle multiple packages with shared node modules, but it also relies on the deployments to the NPM registries, which was not suitable for us as we always use a single version of a package and we have no need to publish our packages separately. We discovered that these shared code libraries such as Lerna and Yarn workspaces offered features we did not actually need. Then we found out that NestJS already gave us an option out of the box.
NestJS monorepo
The monorepo mode supported by NestJS CLI tool promises to manage the dependencies and shared codebases in one workspace. The CLI tool accomplishes this by reorganizing the source code files into multiple sub-directories with shared and app specific tsconfig.json files, using a configuration file that defines the structure for NestJS CLI client. Unlike Lerna, it does not rely on package deployments. On top of that, as we already used NestJS to run our back-end services, we only had a few steps to convert our codebase:
- Combine NestJS applications and shared libraries
- Configure nest-cli.json correctly so everything runs
- Configure CircleCI to run tests and build monorepo applications correctly
- Configure our infrastructure to run monorepo applications
Combining the applications was a very straightforward process. Each application was moved into apps/ directory and the shared libraries were put under the libs/ directory. After this, we could configure a nest-cli.json file that defines where each application is and how it is run. Our project produced a nest-cli.json that looks something like this:
{
  "collection": "@nestjs/schematics",
  "sourceRoot": "apps/mission-control/src",
  "monorepo": true,
  "root": "apps/mission-control",
  "compilerOptions": {
    "webpack": false,
    "tsConfigPath": "apps/mission-control/tsconfig.app.json"
  },
  "projects": {
    "customer-api": {
      "type": "application",
      "root": "apps/customer-api",
      "entryFile": "main",
      "sourceRoot": "apps/customer-api/src",
      "compilerOptions": {
        "tsConfigPath": "apps/customer-api/tsconfig.app.json"
      }
    },
    "console-server": {
      "type": "application",
      "root": "apps/console-server",
      "entryFile": "main",
      "sourceRoot": "apps/console-server/src",
      "compilerOptions": {
        "tsConfigPath": "apps/console-server/tsconfig.app.json"
      }
    },
    "server": {
      "type": "library",
      "root": "libs/server",
      "entryFile": "index",
      "sourceRoot": "libs/server/src",
      "compilerOptions": {
        "tsConfigPath": "libs/server/tsconfig.lib.json"
      }
    }
    ...
  }
With the correct configuration, each application was ready to be run locally. To get everything into production, we needed to reconfigure CircleCI, our CI tool, to run correct commands to test and build every application. Lastly, we configured Heroku to run each application. After that, we had a complete development pipeline that had eliminated our biggest development flow issues.
Conclusion
With the NestJS monorepo, we definitely succeeded in simplifying our development process. We eliminated unnecessary versioning, and managing packages and libraries. Not counting a few bumps with Heroku, the migration to the monorepo mode was pretty straight forward. The work was mostly just restructuring the code into a structure that is also more manageable. More documentation and information about all of the steps from NestJS would have helped, especially as our team is not very experienced with NestJS platform, but I guess that is the case of every software development project.
Back to blog listAddress
Episto Oy
Putouskuja 6 a 2
01600 Vantaa
Finland
VAT ID FI34337429


